if (!require(pacman)) install.packages("pacman")
pacman::p_load(usethis)4 Collaborating with Git and GitHub

Source: phdcomics.com
4.1 Introduction
Git is open-source software for version control. It allows developers to track and manage changes to their codebase and files. Users can access a comprehensive history of their project and revert to previous versions of their data if necessary. It helps to overcome the FINAL.doc problem depicted in Figure 4.1.

Source: https://github.com/about as of April 2024
GitHub is an incredibly popular (see statistics in Figure 4.2) online platform that implements Git’s capabilities by providing a web interface for collaboration.
While you can use Git and GitHub independently, most developers integrate it with GitHub for enhanced project management and collaboration. This combination helps maintain local and remote copies of a project, facilitating teamwork and data backup as GitHub is sort of a backup as data loss at your local machine do not matter if you have a remote version saved on GitHub.
Git and GitHub support simultaneous multi-user access, unlike systems that are optimized for single-user like Dropbox.
4.2 Install Git
To install the version control system Git, follow the instructions here.
Source: DEV Community on GitHub
Familiarize yourself with Git by using the resources available here. Specifically, work through the resources listed in the box below. Although Git may appear complex, it is generally not too challenging for most users. Many people use Git primarily to track their work and to host and share files conveniently with just a handful of commands. While Git is a robust system with many capabilities, you don’t need to memorize all the commands (see Figure 4.3). In fact, you typically use only a few basic ones as shown in Table 4.1.
In the upcoming sections, I will demonstrate some use cases both in the terminal Section 4.3 and within RStudio Section 4.4. In Section 4.5, I show how to contribute to a repository using Git and GitHub.
Learning resources
Plenty books and tutorial exist that introduce Git and GitHub. I’d like to highlight the following sources:
- The book comprehensive book Happy Git and GitHub for the useR by Bryan (2023)
- The much shorter book [Version Control with Git and GitHub] by Halbritter & Telford (2023)
- The online tutorial How to Use Git/GitHub with R of David Keyes who explains in short videos how to setup Git and GitHub in RStudio using among others the
usethispackage.
4.3 Using Git from the terminal

This tutorial will guide you through the basic Git operations using the Bash command line, commonly referred to as the terminal. Essentially, it focuses on the three Git commands illustrated in Figure 4.4.
4.3.1 Configuring Git
Before you start using Git, you need to configure your Git environment. Set your username and email address with these commands:
git config --global user.name "Your Name"
git config --global user.email "your.email@example.com"
4.3.2 Initializing a Repository
To create a new Git repository, use the git init command in the directory you want to version control:
cd /path/to/a/directory
mkdir my_project
cd my_project
git init
In case you are not familiar with using the terminal please consider Table 4.2 where I introduce the most basic commands that we use. For example, with cd you can change your directory and with mkdir you create a new directory. If you are not familiar with the file system of your computer please read the section Navigating the file system of Huber (2024). With git init you initialize the directory to be a git repository. This will create a hidden folder “.git” in which Git keeps track of all your changes.
Most common bash commands
| Bash Command (macOS/Linux) | Windows Command Prompt Equivalent | Description |
|---|---|---|
pwd |
cd |
Prints the current directory’s path. |
ls |
dir |
Lists all files and directories in the current directory. |
cd |
cd |
Changes the directory. |
mkdir |
mkdir |
Creates a new directory. |
rmdir |
rmdir |
Removes an empty directory. |
touch |
copy nul |
Creates a new empty file or updates an existing file’s timestamp. |
rm |
del or erase |
Removes files. rmdir /s is used for directories. |
cp |
copy |
Copies files or directories. |
mv |
move |
Moves or renames files or directories. |
echo |
echo |
Displays a line of text/string. |
cat |
type |
Concatenates and displays the content of files. |
grep |
find or findstr |
Searches for patterns in files. |
4.3.3 Staging Changes
To track changes in your repository, you need to stage them using the git add command. To stage a single file:
git add filename.txtTo stage all changes in the directory:
git add .4.3.4 Committing Changes
After staging, you can commit it to the repository. A commit records changes to the repository and must include a message describing what changed:
git commit -m "A message"4.3.5 Pushing Changes
To share your commits with others or store them in a remote repository (GitHub), use git push. A prerequisite here is that you need to be connected to a remote repo. Therefore, you must add a remote repository by copying the URL of the GitHub repo as shown in Figure 4.5. Then you can add the remote repository and push it to the repo with these lines of code:
git remote add origin https://github.com/username/repository.git
git push -u origin main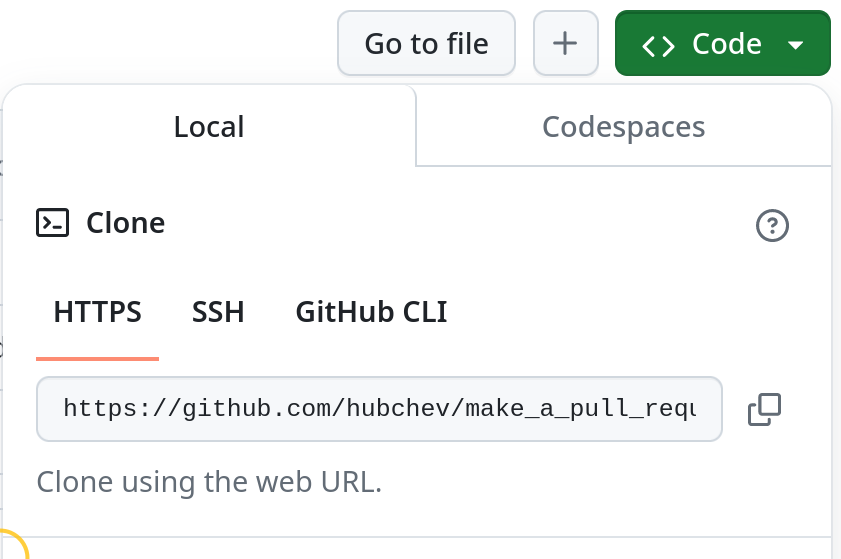
4.3.6 Undo changes
With git reset and git revert you can go back in time and undo specific changes, respectively. For example, with
git log
git reset --hard <commit_id_hash>
you can view the commit history and find the hash identifier of the commit to move the HEAD pointer to that commit. This effectively removes all commits after commit you choose from the current branch’s history. Be cautious when using git reset –hard as it discards all changes made after the specified commit. Make sure you have backups or are certain you want to discard these changes before proceeding.
With
git revert <commit_id_hash>you revert the changes introduced by that commit only. It will create a new commit that undoes the changes made in commit chosen while keeping the other commits that may have followed the chosen commit intact. It’s a safer approach compared to git reset --hard, as it preserves the commit history and allows you to selectively undo changes without affecting the rest of the commits.
4.4 Using Git from RStudio
Integrating Git with RStudio enhances your project management by utilizing version control directly within the IDE. Here’s how you can set up and use Git in RStudio using R code.
4.4.1 Set up Git in RStudio
First, ensure the usethis package is installed and loaded:
Configure your Git settings in RStudio:
use_git_config(user.name = "Your Name", user.email = "Your@email.com")You can change the configuration of your user name and email using the edit_git_config() function.
Start a new project in RStudio, which will also initialize a Git repository:
create_project("~/Music/")
use_git()
After restarting RStudio, you will notice a Git tab in the top right panel, indicating that Git is now active for your project.
4.4.2 Connecting RStudio Projects with GitHub repositories
To connect your RStudio project with GitHub, you need a Personal Access Token (PAT) on GitHub. If you haven’t one already, you can use the create_github_token() function from usethis package, and store the PAT securely with gitcreds_set from the gitcreds package:
if (!require(pacman)) install.packages("pacman")
pacman::p_load(usethis gitcreds)
create_github_token()
gitcreds::gitcreds_set()
Now, the procedure depends on whether the project has bin initialized on your local machine and you want to create a repo on GitHub, or the repo already exists on GitHub and you want to connect that remote repo with your local PC. Both ways are described below.
4.4.2.1 Project exists on RStudio first
After initializing Git in your project, use the use_github() function from usethis to create a new GitHub repository and connect it directly:
use_github()This creates a repo on your GitHub account.
4.4.2.2 Project exists on GitHub first
Alternatively, suppose you have created a repository on GitHub first, then start a new project in RStudio using the version control option, specifying your new repository’s URL. Just click File > New Project > Version Control and then link the GitHub repo by putting the URL into the respective box of the menu. See Figure 4.5 how to get the URL of a repo.
4.5 Make a contribution using Git and GitHub
This is a guide for beginners on how to make a contribution using Git and GitHub. If you are looking to make your first contribution, follow the steps below.
1. Create an account on GitHub
It is for free and should just take some minutes.
2. Install Git
Here is a tutorial on how to set up Git.
3. Fork this repository
Click on the fork button (see Figure 4.6) on the top of this page: https://github.com/hubchev/make_a_pull_request. This will create a copy of this repository in your account.

4. Clone the forked repository
Go to your GitHub account, open the forked repository, click on the code button and then click the copy to clipboard icon, see Figure 4.5.
Then, open a terminal and run the following git command:
git clone "url you just copied"where “url you just copied” (without the quotation marks) is the url to this repository (your fork of this project). See the previous steps to obtain the url.
For example:
git clone https://github.com/this-is-you/make_a_pull_request.gitwhere this-is-you is your GitHub username. Here you’re copying the contents of the first-contributions repository on GitHub to your computer.
5. Create a branch
Change to the repository directory on your computer (if you are not already there):
cd make_a_pull_requestNow create a branch using the git switch command:
git switch -c your-new-branch-nameFor example:
git switch -c add-Stephan-Huber6. Make changes.
Now open theI_am_a_data_scientist.md file in a text editor. (You find this file in the repository.) Add your name, your GitHub account and the project you are working on. You can put it anywhere in between. Now, save the file.
If you go to the project directory and execute the command git status, you’ll see there are changes.
7. Add changes (staging). Add those changes to the branch you just created using the git add command:
git add .8. Commit changes. Now commit those changes using the git commit command:
git commit -m "Add your-name to the list"replacing your-name with your name.
9. Use Git Bash. Open Git Bash and set your email and your nickname on GitHub:
git config --global user.name "FIRST_NAME LAST_NAME"
git config --global user.email "MY_NAME@example.com"
10. Push changes to GitHub.
Push your changes using the command git push:
git push -u origin your-new-branch-namereplacing your-new-branch-name with the name of the branch you created earlier.
If you get any errors while pushing that refers to authentication failed something, go to GitHub’s tutorial on generating and configuring an SSH key to your account. Alternatively, you can watch this YouTube tutorial
11. Submit your changes for review on GitHub.
If you go to your repository on GitHub, you’ll see a Compare & pull request button. Click on that button.
Now submit the pull request.
Soon I’ll be merging all your changes into the main branch of this project. You will get a notification email once the changes have been merged.
Congrats! You just completed the standard fork -> clone -> edit -> pull request workflow that you’ll often encounter as a contributor!